For my first blog post, I wanted to share something that has remained unknown by most Bifrost users. That is, how to create your own enums in Bifrost. Today I’ll teach you how to do it, but first of all, what the hell are enums? Enum is the abbreviation of Enumerator. They are the roll-down, multi-choice widgets you can see in all of your favourite softwares.
In Bifrost they have the same purposes as in any other software. For compound makers however, the way to work with them is a bit different than you would with in Maya, ICE or Fabric Engine. We’ll talk about that a bit later.
First, let’s have a look at how the fuel type from above actually looks like in its nodal form. Start by creating a value node, and click on the “…” button to change its data type. Under the “other” tab, you can find an “Enum” category, along with a roll-down widget. There, you can look for Simulation::FuelType and set it as the data type for your value node.
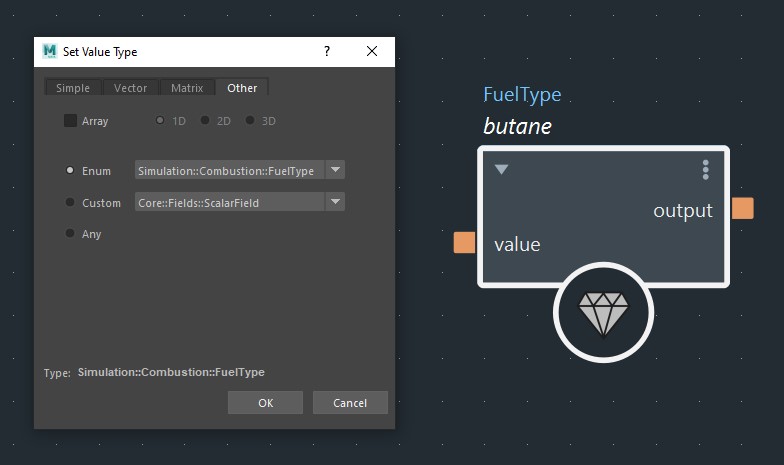
As you can see, the port’s color is orange. One could think that it is a bool type, as bool ports uses the same color, but they are actually their own data type. If you hover your mouse over the port, you can see it clearly written in the info bar, at the bottom of your graph.

The active value shows 0, which means the first member of the enum list, in this case, butane. So it is an integer? Well, not exactly. Although it uses integer values under the hood, the enum data type cannot be used as such within Bifrost. If you try to connect it into a node that has an type long port, it will return an error. Also, it cannot be explicitly converted to a type long.

So how are they typically used? The answer is by using a condition chain. You set a port using your custom enum data type, and you compare its value with other value nodes of the same enum type, each one with a different element of the list. If the port’s enum value is equal to one of the other enum values, then, this case will be used.

The idea it to set this up inside a compound, and only expose the input enum type and the true_case / false_case ports. These ports can then take whatever data type you decide to feed in.

Now that you’ve learned how to set and use enum types, I’ll show you how to make your own custom enumerator. The tricky thing is that, in contrary to Maya, ICE or Fabric Engine, Bifrost does not currently have a mechanism to create custom enum types within the graph’s UI. This might change in the future, but for now, the only way is to create your own custom .json file. First, let’s have a look at the piece of code below.
{
    "header": {
        "metadata": [
            {
                "metaName": "adskFileFormatVersion",
                "metaValue": "100L"
            }
        ]
    },
    "namespaces": [],
    "types": [
        {
            "enumName": "MJCG::myCustomEnum",
            "enumMembers": [
                {
                    "enumKey": "Create",
                    "enumValue": "0"
                },
                {
                    "enumKey": "custom",
                    "enumValue": "1"
                },
                {
                    "enumKey": "enum",
                    "enumValue": "2"
                },
                {
                    "enumKey": "in",
                    "enumValue": "3"
                },
                {
                    "enumKey": "Bifrost",
                    "enumValue": "4"
                }
            ]
        }
    ]
}
The first thing we want to look at is line n°13. This is where you should define your namespace, in this case MJCG, followed by a double punctuation :: and finally by the name of your enum data type. This is important that you set it right from the very beginning. If you change the namespace or the enum types name later, it will introduces compatibility breaks into compounds that make uses of it, because Bifrost will no longer be able to find the enum type you used inside your compound.
        {
            "enumName": "MJCG::myCustomEnum",
            "enumMembers": [
                {
Then, Let’s look at line 16-17. The first line is where you define the name of each enum’s members. This is a string, meaning that it can accept spaces, maj characters, etc. Perfect to give nice names to your enum members. The second line is the enum value. Remember? We’ve seen this before. This is the actual integer that is used under the hood to list the enum’s members. These have be unique per members. As you can see in the exemple above, they are set from 0 to 4, each one assigned to a member. They define the order of appearance inside the enum’s list. The cool thing is that, you can append enum members without introducing breaks. If you don’t change the ones that was set before a change occurs, Bifrost will just list the new members at the end of the current list.
            "enumMembers": [
                {
                    "enumKey": "Create",
                    "enumValue": "0"
                },
Now the fun part, let’s create out own enum file! Start by creating an empty text file, give it a name, and set its extension to be .json . The file must be placed in a folder that Bifrost can find. If you don’t have your own library set up, then you could use the default compound location which is C:\Users\myName\Autodesk\Bifrost\Compounds on Windows.

Then, you can edit the code from above and paste it into your .json file. Save the file, and most importantly, you must reload Maya or Bifrost so that it loads your custom enum file. Once the graph shows up, create a value node, go into the enum section and find your enum type based on the namespace you’ve defined, and voilà! Now just select it and press OK, and your enum type will be applied on your value node.


This concludes our lesson on how to create custom enum types in Bifrost. It is an advanced feature, but if you are a compound maker, you will definitely want to make use of these sooner or later. I hope you found this article useful, and I’ll come back soon with more Bifrost stuff.
Maxime

That’s a good one Max. I pray it grows well and have others to contribute heavily to the blog. Thank you
LikeLiked by 2 people
Legit need more Maya users like you
LikeLike
Hi Maxim I just found out your site and love your blog they are so easy to understand for a newbies like me . I am for sure spend a decent amount of time to go through. They are advance topics but worth going practicing.
LikeLike