Today I’m going to talk about Bifrost strands. Strands can be intimidating at first, but dealing with them is actually quite straightforward. The purpose of this blog post is to make you familiar with the strands data structure, the different methods that you can use to manipulate its data, and also introduce you to a few useful compounds that I hope will make your life easier. Let’s get started!
Part 1: strand_offset
When I started using Bifrost, I was a little bit confused about how to manipulate strands data. Back in Softimage ICE, strands were treated as “array of 3D vectors per point” which was a sort of 2D array where the first dimension was the point cloud’s point position, and the second dimension was each sub-strand’s point positions. In Bifrost, the data structure of strands objects are different. The strands schema is based on two components: the point_component, holding per point properties, and the strand_component, holding per strand properties. Strands objects can contain multiple sub-strands, but these will always shares the same array of point position. You could picture Bifrost strands as a point cloud with additional data containing connectivity informations between its points: the stand_offset property.
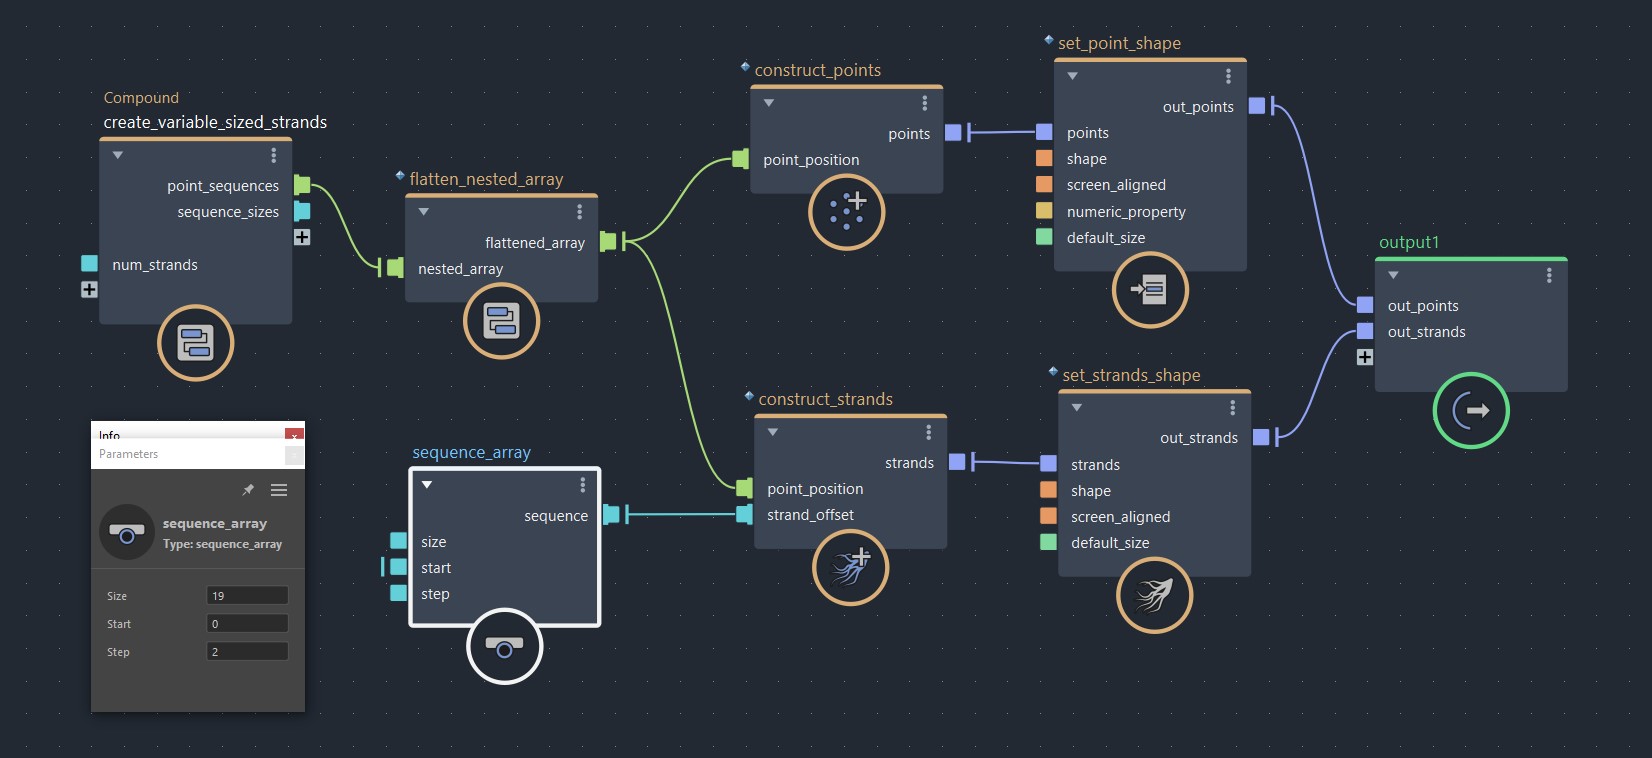
Before I explain how to deal with the strand_offset, I’ll start by showing you what happens if you don’t use one. In the following exemple, I created an array of float3 sequences, each one of a different size. Since sequence_array outputs an array, an array of sequences results in a 2D array. Then, I flattened this 2D array back to a 1D array, so that it can be used to construct a point cloud object.


Now that we have our points visualized, let’s bring in a construst_strands node. This compound is one of the two compounds usually used to build strands from scratch (we will see the other one later). Now let’s connect our flattened_array to the point_position port, and let’s see what happens in the viewport.


As you can see, construct_strands created a single strand passing through all our the point position, creating this zip-zag pattern. Before I explain how to divide this strand into multiple sub-strands, let’s place a watchpoint to analyze our strands object’s properties.

Don’t you spot anything weird here? Our strand_component count is 1, but the size of strand_offset is 2. If we have a single strand, why does the strand_offset property hold 2 elements ? Furthermore, we didn’t plug anything in the strand_offset port. Why isn’t its size 0 ?
The reason for that is, internally, construct_strands automatically checks if the input strand_offset array is empty, and if it’s null, it generates a default strand_offset in order to create a valid strands object. In this case, [0, 36].
[0] is the our first point index. [36] the our last point index plus one (35 +1) , which is equal to the size of our point_component count. A strand_offset will always be equal the the count of strand_component plus one. This is because Bifrost needs to know where each sub-strands starts and ends. For exemple, if we created 2 strands with 4 points, we would have to use a strand_offset of [0, 2, 4].
That being said, let’s divide the strand that we created earlier into multiple sub-strands. In this particular case, since our points were created using an array of sequence_array, we could use their sizes to build a strand_offset. So let’s start by exposing this out of our compound.

Our sequence_sizes array looks like [6, 8, 10, 12], which is the number of points contained in each sequences. Before we go any further, the first we have to do is it add a [0] value at the beginning of our array, because we want our offset array to start on the first point index. We can do this using a value node along with a build_array.
Then, we can feed the result in a cumulative_sum_array. What this compound does is return an array of partial sums, where each element of the output array is the sum of the current + previous elements. So our input array [0, 6, 8, 10, 12] will become [0, 6, 14, 24, 36], which suits our point arrangement. Finally we convert the result into an unsigned integer, and plug this into the strand_offset port. Tadam! We now have our strands divided according to our points sequences!


While I wanted to teach you how to build a strand offset from scratch, you don’t actually need to use this method. If you already have an array of sizes, Bifrost has a compound called create_strands_from_counts, which you could use to build a strands object directly from it. Then, all you have left to do is set your point positions,and you’ll get the same result as with the method shown above.

Strand offsets are not necessary meant to be created from sizes, you are free to use any kind of algorithm that can results in something that suits your needs. The only important thing is to respect the offset pattern explained above. Here is one more example where I use another sequence_array with a step of 2, plugged into the strand_offset port of a construct_strands. The result is single segments between points.

[ 0, 2, 4, 6, 8, 10, 12, 14, 16, 18, 20, 22, 24, 26, 28, 30, 32, 34, 36 ]Part 2: per strand operation
Most of the time, you can manipulate strands data without dealing with loops, but in some cases, you need to use per strand operations in order to compute the data that you need, like computing strands length, basis vectors…etc.
To to this, the first things we need is a get_strands_structure. This simple compound returns the various properties related to a strands object’s structure. Then we need a for-each compound. This compound will allow us loop on each strands in parallel. Now, let’s connect strand_count to max_iterations, and let’s also connect our strand_offset to a new port. In this exemple, I will operate on the point_position property, but you could use this method with any per point property.

Inside the for-each compound, we want to use access_offset_array. This compound, as its name indicates, allow you to access the range of a given offset index, by giving you the start index, end index and the length of the current offset. In most cases, you might want to use this along with slice_array (or small_slice), which is used to cut a portion of an array. Like this, you can access only the point indices of a given sub-strand. As mentioned earlier, this could be used to get a portion of point_position, but could also operate on any other per point property. Once you data is sliced, you are can start to add your nodes to compute the data that you need.


Because our for-each loop outputs an array for each iterations, the result outside the loop becomes a 2D array, where each sub-elements contains the strands’s slices. In order to feed this data back into the point_position property, we have to re-convert this 2D array back to a 1D array, which we can do by using flatten_nested_array. Alternatively, you could do the per strand operation inside an iterate compound and append each iteration result to an array using a state port, but by experience doing the per strand operation in parallel first and flattening the array after tends to offer better performances.

Part 3: sampling strands
get_from_interpolated_array is a compound that I use very often inside per strand loops. This compound is super useful, it allows you to sample a value across an array. Given a float value (or an array of floats), this compound returns interpolated values between each indices from an input array. A kind of linear interpolation, but instead of interpolating between two values, it interpolates across a whole array. A lot of possibilities, and not only for strands! For exemple, I’ve recently used this compound to attach a bunch of joint chains to a strands simulation. You could also use this to place some instances along strands, make a some rigging solver…etc


Part 4: other useful properties
Manipulating strands does not have to be this technical. In a lot of cases, you don’t have to bother using loops, or even care about the strand_offset. Here are a couple examples showing how you can use other compounds and properties to manipulate strands.
update_strands_basis: This compounds computes the basis vectors (point_tangent, point_normal, point_binormal) of strands points. These vectors can then be used to compute a point_orientation property using strands_basis_to_orientaiton. This can be used to get transformations along strands, like if you need to extrude, scatter instances, or do various rigging tasks. Although update_strands_basis is faster, you could also use update_strands_orientations from MJCG_compounds, which offers a few more advanced features like per strand up-vector, and various framing algorithms.


update_strands_length: This compound computes length related informations. point_length is a per point property returning the length of each strands points relative to their first points. strand_length is a per strand property that returns the total length of each strands. This is useful to make effects that dependent of strands length, or to compare the lengths of strands with other objects (a joint chain, for example). Here I used it to add oscillations to a bunch of strands.


update_point_ratio: This compound computes root to tip data. point_ratio returns float values between 0 and 1 for each strands points. Points between the strand’s boundaries returns a fraction between 0 and 1. Unlike point_length, point_ratio is not based on segment’s length, but on the points indices. Therefore, a value of 0.5 doesn’t necessarily mean that this point is at halfway across a strand’s length, but rather on its middle point. A typical use of it is feeding the data in a evaluate_fcurve to drive some effects.


update_point_strand_index: This compounds checks what is the strand index of each points, and save the result into a point_strand_index property. The points on the first strands will be [0, 0, 0, 0…] points on the second strand [1, 1, 1, 1…] and so on. This can be useful in some cases, like, if you want to add random color per strand, but populating these values on a per point property. This method was demonstrated recently by Jonah Friedman on the Bifrost forum. This compound is an internal compound that is not currently listed in the tab menu, you can get it by going inside update_strands_ratio.


This blog post on strands comes to an end. I Tried to talk about everything there is to know about strands, so hopefully Bifrost strands won’t have any secret left for you. As always, thank you for taking the time to read, and if you’ve enjoyed this article, please share it around so that people can get more comfortable with this kind of stuff. I’ll see again you in the next blog post, which might be a video tutorial this time. Who knows!
Have fun Bifrosting,
Maxime

Thanks Maxime!
LikeLiked by 1 person
Lots of useful information! Thank you for writing it up.
LikeLiked by 1 person
I get a problem.
LikeLike
I try to connect plug between start_6_step_2.sequence = sequence_array.size. a error is output that erro type to connect. why is that? sequence_array.size is’t allowed connected to array type?
LikeLike
You should ask for help on the Bifrost Discord server: https://discord.gg/bifrost-addicts
LikeLike
I solved this problem placing a to_int in the middle of the connection.
LikeLike
can you email my bifrost file about this article?
LikeLike
Thank you for breaking this down into simple steps. Its the perfect intro to doing more complex set ups with Bifrost. I am going to use this to help teach others
LikeLike
[…] guide for working with Strands in Bifrsot comes from Character Technical Artist Maxime Jeanmougin. Visit the Bifrost Strands Guide here, and let’s get into […]
LikeLike
[…] Of course, when talking about strands, it is worth noting that the definitive guide in Bifrost comes from Character Technical Artist Maxime Jeanmougin. Visit the Bifrost Strands Guide here. […]
LikeLike